Github : https://github.com/sutthipongl/QMApp
Table of Contents
- What is Queue Manager Application ?
- Configuration and Installation
- How to use
- Live Update
- Customization
- Logging and Statistic
- Auto Logout
1) What is Queue Manager Application ?
When your team uses a shared task pool and each member manages their own queue, it can be challenging for managers to keep track of availability—especially in urgent situations. The Queue Manager Application (QMApp) solves this by providing a real-time overview of team members and their statuses (e.g., Ready, Busy, Meeting), enabling managers to identify who’s ready to take on tasks.
Team members can self-assign tasks from the pool, promoting accountability without managerial intervention.
QMApp operates via two main components: a NextJS frontend (for GUI and server-side rendering) and a Qserver backend (handling API requests, WebSocket communication, and data persistence).
Each user is provided a private URL, such as:
https://qmapp.deepbluebits.com/user1/tXqosZ1KFU8VsfzJ9FGjF0qEwrCX1Wok
https://qmapp.deepbluebits.com/user2/Guq0R6gDAtowQxz6LMJRJYog4J7bAAj6
https://qmapp.deepbluebits.com/user3/yXEAiJjYXP2WMTFPTQ7bBJZD8ibTaVuy
https://qmapp.deepbluebits.com/user4/HUSdJQwzRNGKdLETDZktthLF4bnfsMFY
https://qmapp.deepbluebits.com/user5/H2sJAOrjIZs53WjWwtcQTAexmIy899cG
2) Configuration and Installation
2.1) System requirements
Requires Node.js version 18.18 or later.
2.2) Pre-Configuration
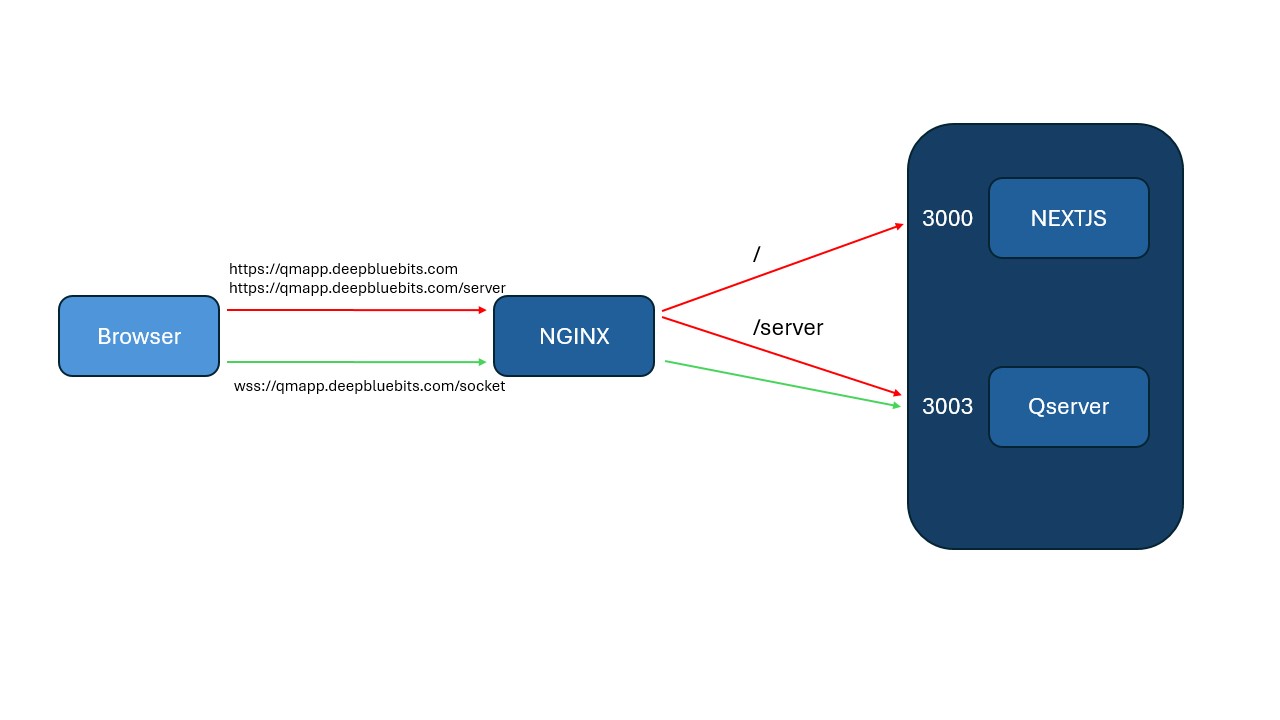
For optimal performance, it’s recommended to use NGINX as a reverse proxy. This allows the frontend and backend to communicate efficiently.
- Frontend Access: NGINX routes requests to the NextJS server on port 3000.
- Task Requests: Actions like joining the queue or picking tasks are handled via POST/GET requests routed through /server to Qserver on port 3003.
- WebSocket Updates: Real-time updates are sent over WSS via the /socket route, also forwarded to port 3003.
2.3) Configuring NextJS
Edit the package.json file to define your server IP and desired port (default is 3000).
"dev": "next dev --hostname localhost -p 3000",
"start": "next start --hostname localhost -p 3000",
2.4) queueConfig.js
All major configurations are handled in queueConfig.js, including server paths, ports, keys, and user statuses.
"internalRequestURL" : "http://localhost:3003",
"externalRequestURL" : "https://qmapp.deepbluebits.com",
"webSocketURL" : "wss://qmapp.deepbluebits.com/socket",
"QServer" : "localhost",
"QServerPort" : "3003",
"basePath" : "",
"basePathServer" : "/server",
"QDBFile" : "taskQueueDB.json",
"keys": {
		"user1":"tXqosZ1KFU8VsfzJ9FGjF0qEwrCX1Wok",
		"user2":"Guq0R6gDAtowQxz6LMJRJYog4J7bAAj6",
		"user3":"yXEAiJjYXP2WMTFPTQ7bBJZD8ibTaVuy",
		"user4":"HUSdJQwzRNGKdLETDZktthLF4bnfsMFY",
		"user5":"H2sJAOrjIZs53WjWwtcQTAexmIy899cG",
	},
"defaultStatus": userStatus.READY
- internalRequestURL : This is the URL when NextJs server-side code send requests to Qserver. Genernally bith NextJS and Qserver run on same host but it’s possible to deploy in different host
- externalRequestURL :Create new scratch file from selectionexternalRequestURL : This is the URL when NextJs client-side code send requests to Qserver
- webSocketURL : This is the URL when NextJs client-side code or browser connects Qserver for live update
- QServer : Host or IP address where we host Qserver
- basePath : We don’t always deploy web application at root folder. In case we deploy under specific path for example, http://mydomain.com/myapp, we can configure /myapp as base path. Blank value refer to root path (/)
- basePathServer : Similar to basePath, this is the basepath for Qserver
- QDBFile : DB file for this applicatin in JSON format
- keys : The list of user and keys. Add or remove users as need
2.5) NGINX Setup
NGINX should be configured to forward paths:
- / to NextJS
- /server to Qserver
- /socket to WebSocket connection for Qserver
Example NGINX configuration
server {
    server_name qmapp.deepbluebits.com;

    location / {
        proxy_pass http://localhost:3000;
        proxy_set_header Host $host;
        proxy_set_header X-Real-IP $remote_addr;
        proxy_set_header X-Forwarded-For $proxy_add_x_forwarded_for;

    }

    location /server {
        proxy_pass http://localhost:3003;
        proxy_set_header Host $host;
        proxy_set_header X-Real-IP $remote_addr;
        proxy_set_header X-Forwarded-For $proxy_add_x_forwarded_for;

    }

    location /socket {
        proxy_pass http://localhost:3003;

        proxy_http_version 1.1;
        proxy_set_header Upgrade $http_upgrade;
        proxy_set_header Connection "upgrade";
        proxy_set_header Host $host;
        proxy_set_header X-Real-IP $remote_addr;
    }

}
2.6) Installation
After unzipping and configuring, install dependencies:
npm install
Start backend server:
npm run Qserver
For development:
npm run dev
For production:
npm run build
npm run Qserver
npm run start
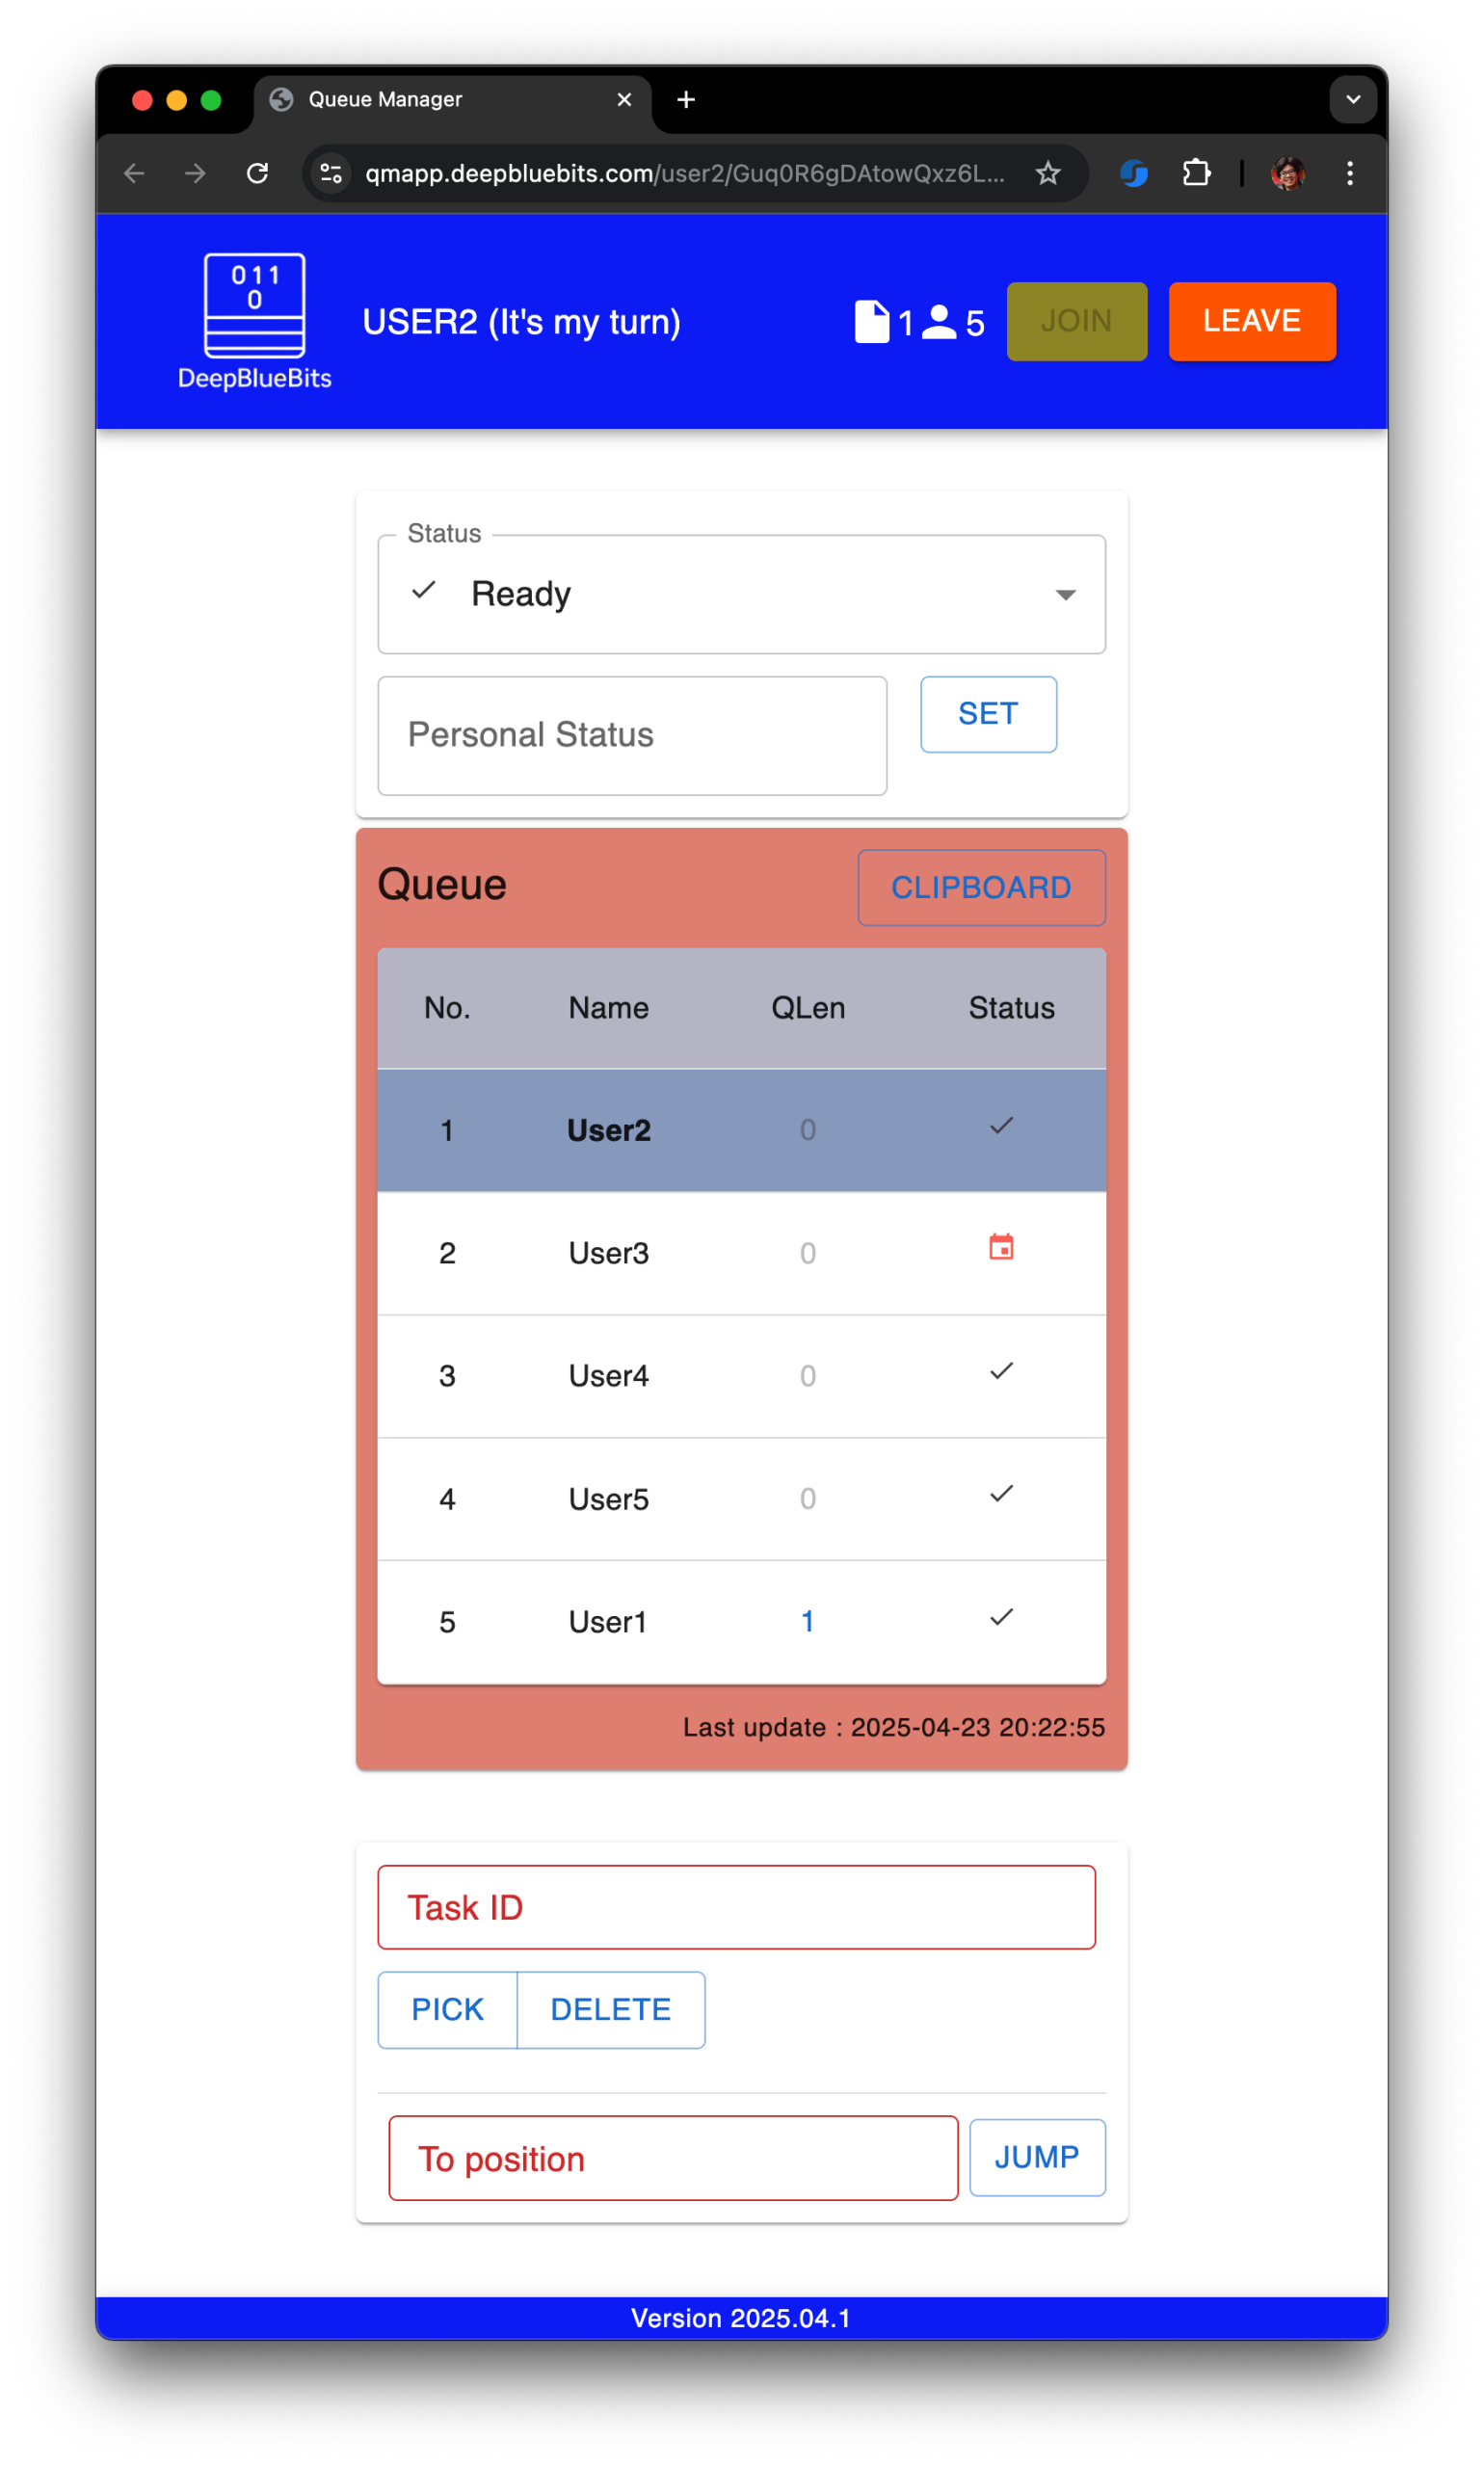
3) How to use
3.1) Joining/Leaving Queue
Users access their URL and can join or leave the queue with the respective buttons in Nav bar.
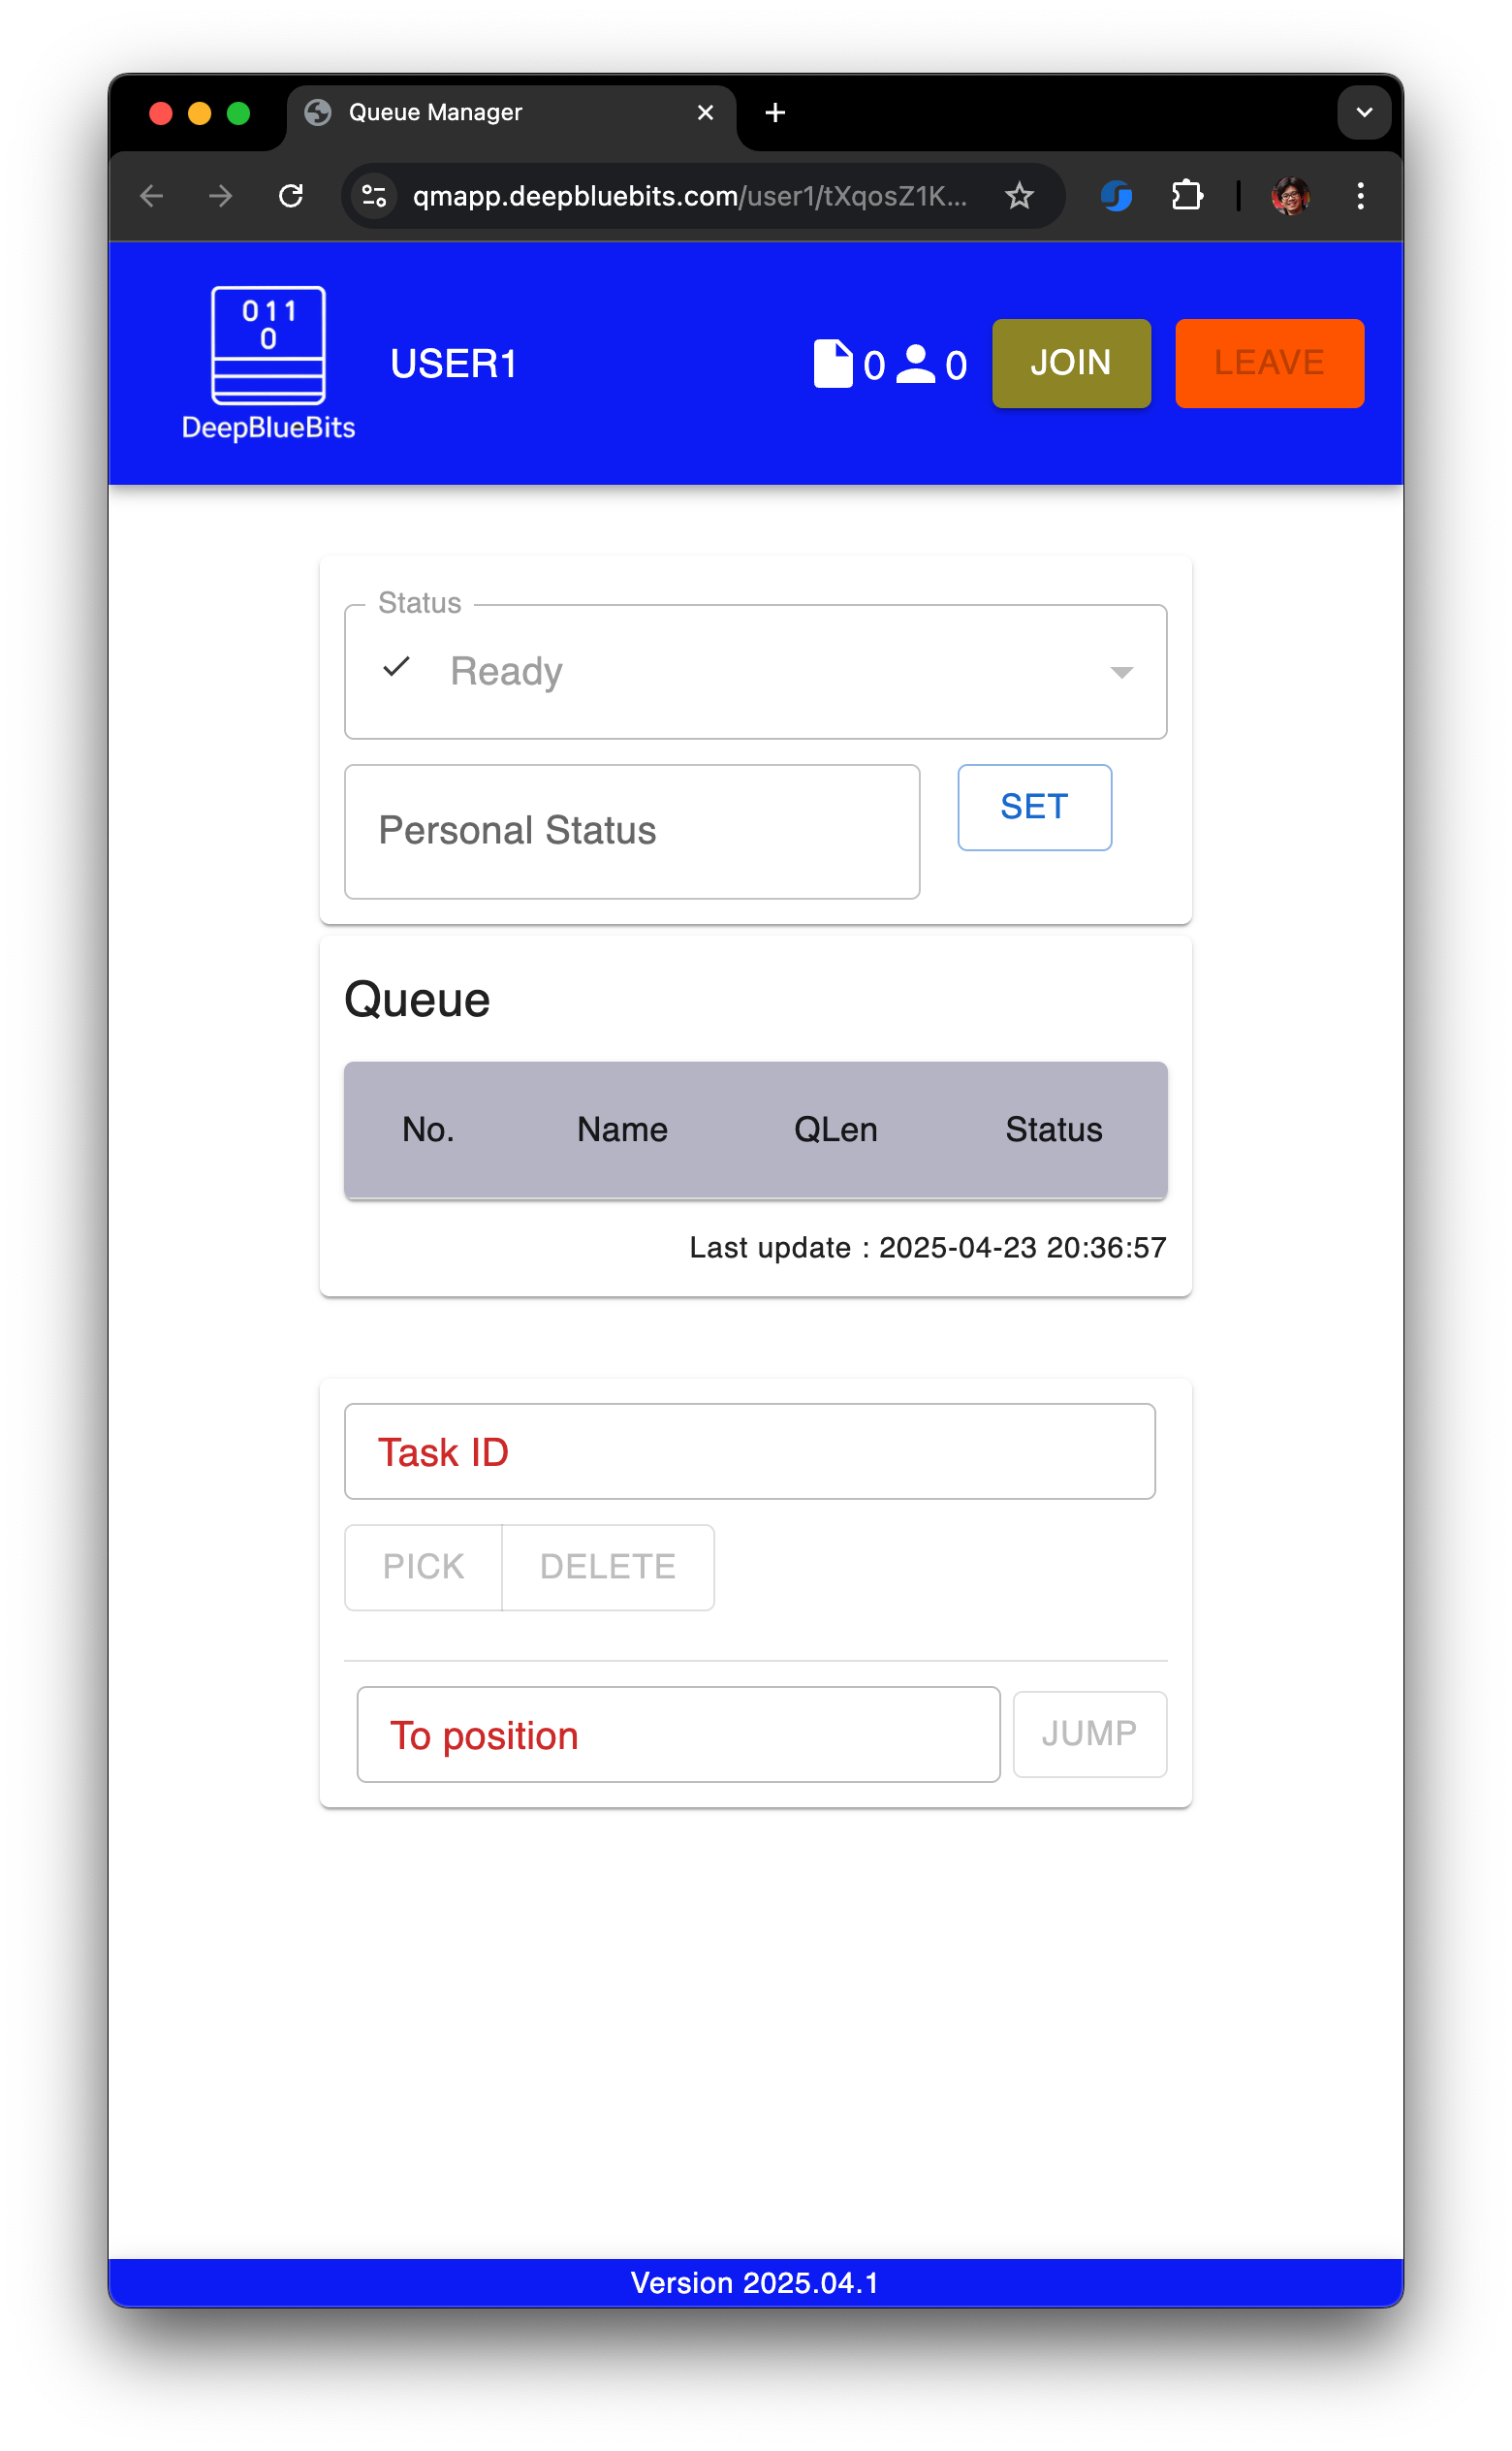
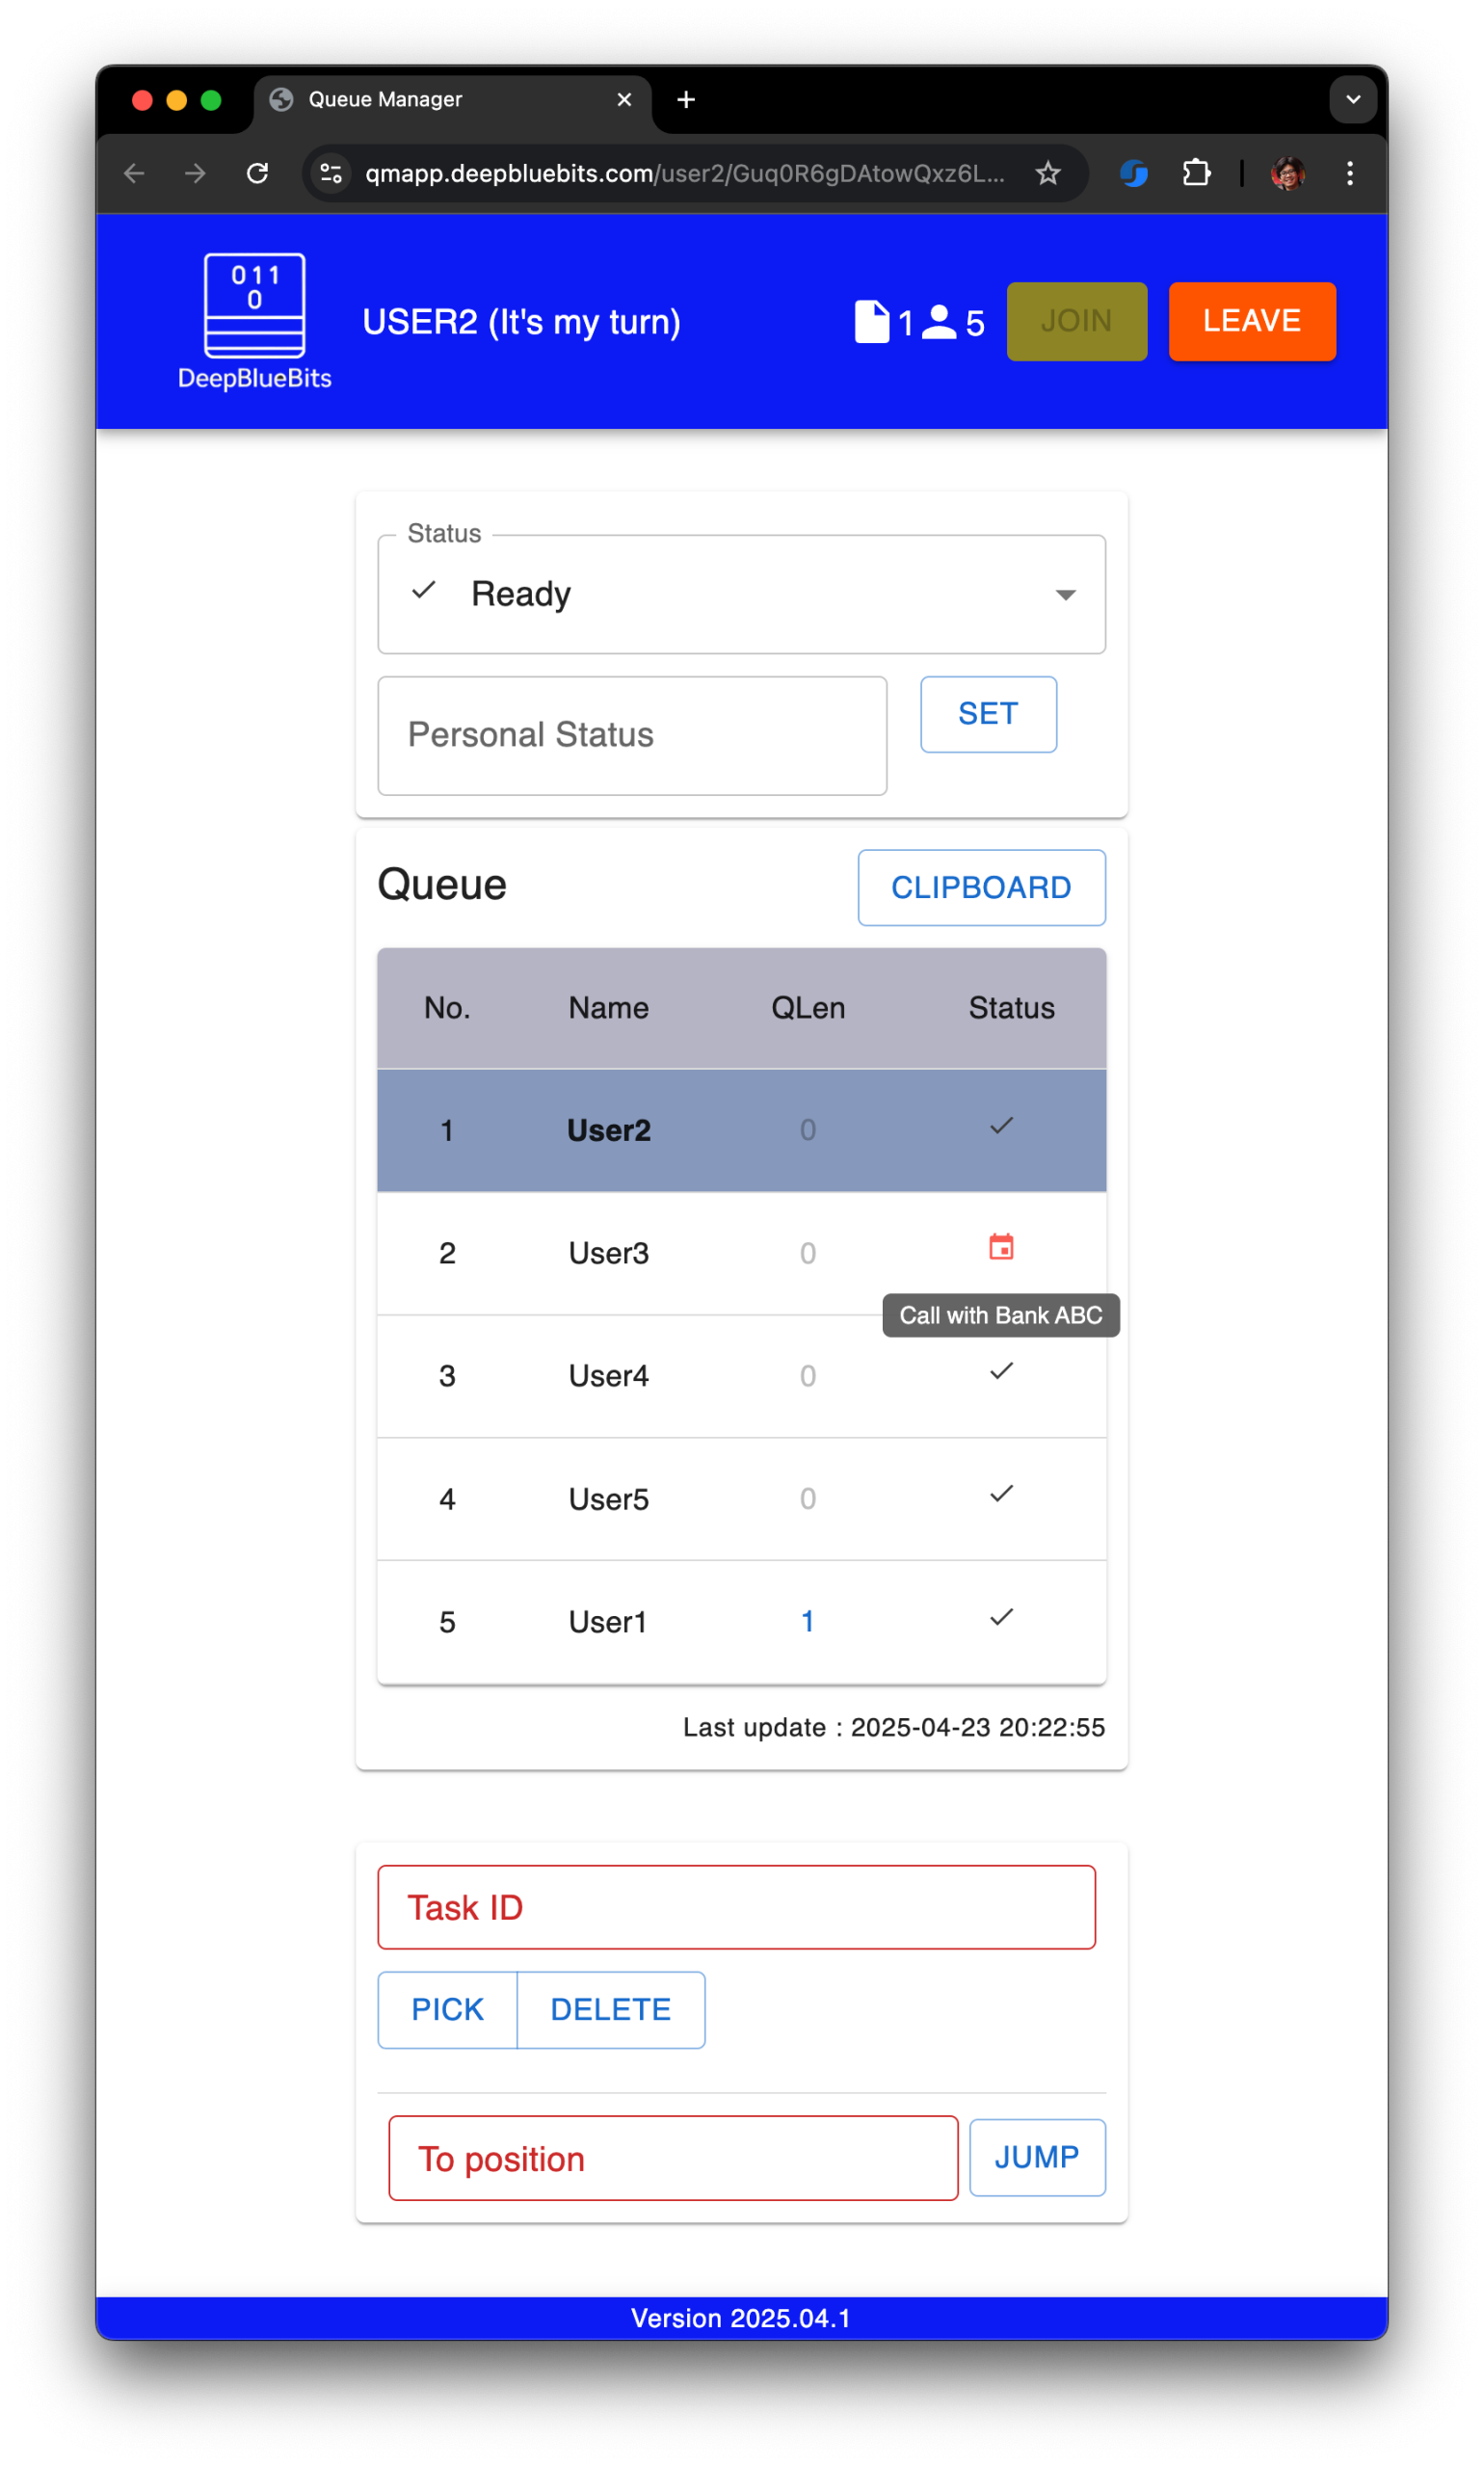
When joined, users are added to the queue list and may be highlighted if they’re first and available. User joined or left queue will affect to a number of people shown as Person Icon at top bar
3.2) Task pickup
To assign a task, input the Task ID and click “PICK”. The user is moved to the end of the queue with the task tagged. To view Task IDs for each user, click the number in QLen column.
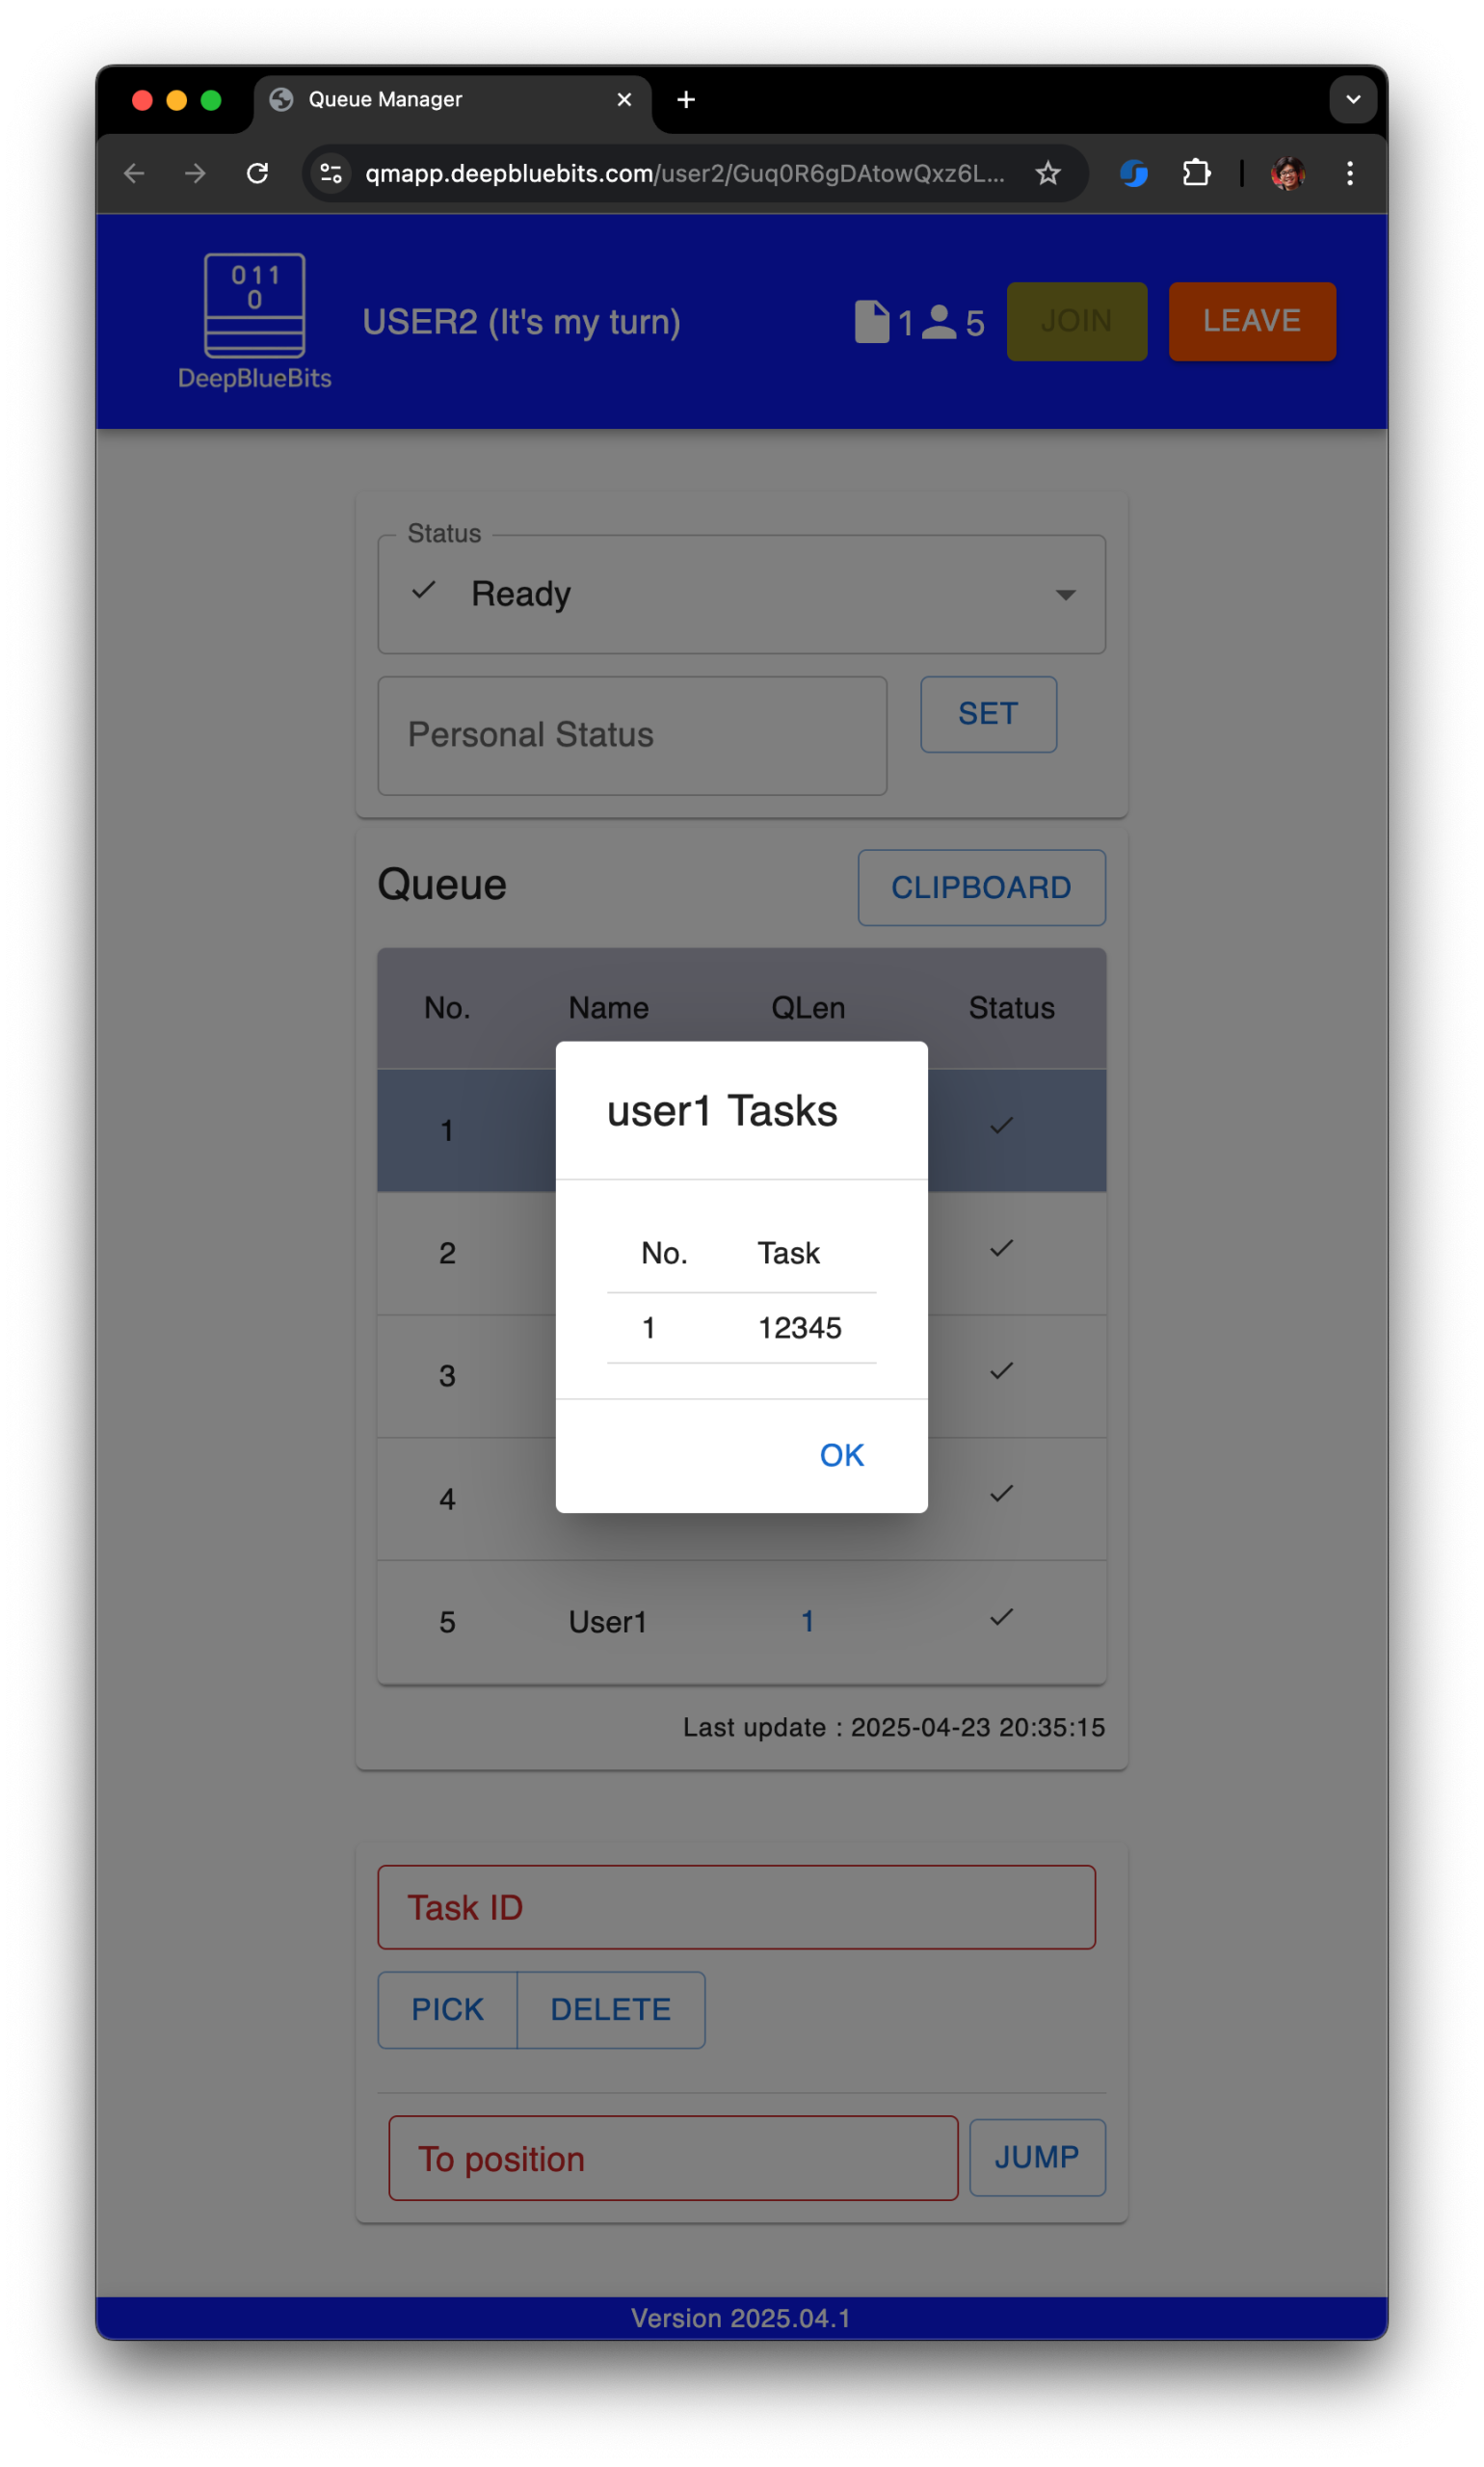
The document icon in the top bar displays the total tasks, which is the sum of the QLen column
3.3) Task deletion
To return a task, input its ID and click “DELETE”. This removes the task from the user’s list.
3.4) Status Updates
Users can set their availability status and add a personal note. A red icon indicates a custom status message.
3.5) Queue Jump
Users can move to the front of the queue manually—useful if joining late and wanting to take initiative.
3.6) Export
When queue has at least one user, “CLIPBOARD” button will be visible. Click this button to export the present queue status to clipboard. Hence we can share or post the present Queue status easily
4) Live Update
QMApp uses WebSocket to push real-time updates when users interact with the system. If disconnected, the queue table turns orange as a visual alert to refresh the page.
5) Customization
5.1) User status
QMApp comes with pre-defined User status. To add or remove User status, please edit /constant/userStatus.js
const userStatus = {
        "READY": "ready",
        "BUSY": "busy",
        "MEETING": "meeting",
        "LUNCH": "lunch",
        "PROJECT" : "project"
    };
Then Add or Remove Status from /app/[user]/[userKey]/home-page.js

Lastly, configure Icon for new status in /util/icon.js. You can find the list of all MUI Icons from this link
5.2) Logo
Logo file is /public/companyLogo.png and should have transparent background
6) Logging and Statistic
Qserver writes log file and statistic file into /log folder. Statistic file shows a number of task for each user, hence Manager can trace how busy the team is.
7) Auto Logout
At the end of day, Qserver automatically logout all users so the queue will be empty next day. To disable Auto logout, please comment out or remove this line in Qserver.js
setInterval(scheduleTask, 30 * 60 * 1000);
By default, Qserver will log users out from queue at 22:00 Server time. To change the time, please update this line
if (now.getHours() === 22) {